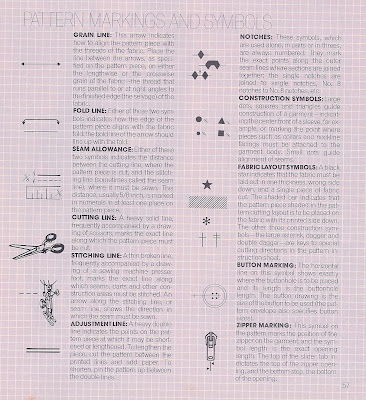
Patterns are flat. People are not. How to figure out how the flat pattern comes together to cover a three dimensional figure is provided by the pattern markings and symbols.
Grain line and fold lines indicate the best way to align the pattern piece with the weave of the fabric so it hangs properly.
Other symbols like notches indicate where to align two different pattern pieces together. Alignment lines indicate where to lengthen or shorten a pattern piece before laying it on fabric. Seam allowance show where to stitch the seam together (difference between the cutting line and the seam line). Construction marks indicate where to place pockets, pleats, buttonholes, the center front of a sleeve or collar, guide alignment of seams. There are also Fabric layout symbols indicating if the pattern must be laid out on a single layer of fabric, print side down or special cutting instructions. Button and zipper marking determine where to place these items.
Figure Types and Sizes
In order to select a pattern, you must pick the correct size.
Women's pattern sizes are rigorously standardized as compared to retail sizes. There are seven figure types for women based on measurements with the Missus being the average. Men's patterns have one type.
To determine your figure type you have to first check your own measurements and write those done. The illustration below shows red bands across the areas to measure in which the book directs the reader.
Taking Measurements:
Women
1. Height--Standing erect with no shoes against a wall. Use a ruler level on top of your head, mark the spot where the ruler touches the wall. Measure from floor to the the mark.
2. Bust--Measure across the fullest part with the tape slightly raised in back. (Note: It is probably better to measure your upper chest with the tape under your arms and above your breasts for a more accurate neck and shoulder fit.)
3. Waist--Tie a cord around the narrowest part. Measure. Leave cord in place for other measurements.
4. Full Hip--Measure from behind the fullest part (7-9 inches below waist).
5. Back-Waist Length--Measure from the top of the spine to the waistline cord.
6. Arm Length--Measure from the shoulder bone to the elbow. With the elbow bent, measure under elbow to wristbone.
7. Crotch Length--Sitting on a hard surface measure from the waistline cord to the surface. (Note-- for a better measurement, stand straddling a yardstick with the yardstick 90 degrees from your body. Measure from yardstick to waist. Below is a quick sketch illustrating how to get this measurement.
Mens
1. Height--same as for women.
2. Neck--Measure around the neck about an inch above the top of the spine.
3. Chest--With the chest slightly expanded, measure from the shoulder blades across the fullest part with the tape under armpits.
4 Sleeve Length-- measure fromteh top of the spine across to the shoulder bone point then down the elbow. Bend the arm to a right angle and measure from under the elbow to the wrist.
5. Arm Length-- measure same as for women
6. Waist--Start at the navel and measure around the body.
7. Hip or Seat--Measure at the widest part of the hips/buttocks and at the midpoint of the pelvic bone.
8. Crotch--Measure from the waistline cord as for women.


No comments:
Post a Comment